Showing posts with label tips. Show all posts

18 April 2012

SL Photography: The Basics

I found this tutorial from http://www.vintfalken.com and all the below text is from the original sourse.

This tutorial is written for people using a computer with a Windows operating system, so things can be a bit different with the Second Life client for Mac or Linux. As soon as someone buy’s me a MacBook, I’d be happy to adjust it for Mac users too. ;)

If you have any comments, further questions or if you think I’m mistaken about something or should add some more information about a particular subject, you can leave a comment at the end of this page or IM me in-world.

There are three ways in which you can take photographs in Second life:
  • Using Old-skool print screen.
  • Using the Second Life viewer’s snapshot functions.
  • Using in-world Second Life photography equipment.

Old Skool Print Screen.
Using your print screen button on the keyboard is the simplest way to capture what you are currently viewing on your computer monitor. You press the ‘Print Screen’ (Print Scr) button located in the upper right corner on your keyboard and everything you see on your monitor at that moment is copied to your clipboard.

If you only want the active window to be copied – for instance, if you have other windows open that clearly contain some pr0n – you might want to consider using Alt+PrintScr, which sends only the current active window (the Second Life client) to your clipboard.

Now just go to your favorite image manipulation software and chose ‘paste’ or press Ctrl+V and save the file – preferably as a .jpg – to your harddisk. If needed, even Paint will do that trick.
Drawbacks: You also capture the Second Life interface and the resolution and image size of the picture depend on your monitor’s settings.


Second Life Snapshot Functions
First you need to learn how to look around in Second Life. This is just about knowing which buttons to press and after a while you won’t even need to think about that anymore.
The left and right arrows will make you turn around your avatar’s vertical axis.
Mouse scroll will let you zoom in and out. If you zoom in that much that you go into ‘Mouselook’ your snapshot options will be limited to ‘Snapshot to Disk’. You can leave ‘Mouselook’ by pressing Escape on the keyboard.

If you keep Alt pressed, you are able to move the camera around using the arrow keys, Page Up (Pg Up) and Page Down (Pg Dn), but your avatar will almost always be in the center point of your camera view.
You don’t need to keep your avatar in your photo : if by holding the Alt key and clicking somewhere, the camera will point towards that new selected point. Press Esc to get back to normal view.
Just play around with those keys a bit, and you’ll soon get the hang of it.

There are two options for taking photographs of your Second Life using the viewer’s build in snapshot function:

  • Snapshot to Disk (Ctr+ˆ on my keyboard, but it seems to differ depending on which keyboard you use, it can also be Ctrl+’)
  • Take Snapshot (Ctr-+Shift+S)
Both functions save your snapshot as a .bmp file.


Snapshot to Disk (Ctrl+’ or Ctrl+^)
This is the simplest option of the two and there isn’t anything this one does that the ‘Take Snapshot’ can’t do. It’s easy though if you want quickly to take a lot of snapshots and later decide which ones you keep.
You will save your camera view of that moment (a couple seconds delay is possible) without the interface and the size will be that of you monitor’s resolution. The only things you have to do to choose the filename and location on your hard disk to save it to.


Take Snapshot (Ctrl+Shift+S)
I’ll go over the options here one by one. Beware that if you change any of the options in the ‘Take Snapshot Preview’ panel, a new snapshot will automatically be taken.
What would you like to do?
  • Send a postcard
  • Upload a snapshot
  • Save snapshot to hard drive
‘Send a postcard’ allows you to email a picture from within Second Life to an outside email address for free. You can mail it to yourself or you can use this for uploading the snapshot directly to Flickr or other image sharing services.

‘Upload a snapshot’ directly uploads the snapshot you see in the preview into your second life inventory (Photo Album) and costs you 10L$. If you’re not enormously rich, it’s wiser to first save the pictures to your hard drive and then later to choose the ones you like best and to upload those.

‘Save snapshot to hard drive’ downloads the .bmp file to your hard drive. It’s the best option to use, as you can do with the pictures as you please: delete them, upload them to Second Life (it’s also 10L$ then), mail them to your friends, edit them using imaging software, upload them to Flickr, … Mind that because of file size issues, you will need to convert the .bmp files to the .jpg file format. (free online image converter)

What size image do you need?

This option is to choose the size of your snapshot and thus also it’s file size. The choices you have depend upon your answer on ‘What would you like to do?’ If you select a larger number, the quality of your picture increases, but so does it’s file size. For example: 1600 x 1200 is a .bmp file of 5.5Mb.


Image Quality

Because there the file size of the pictures you can send as a postcard is limited to 1MB, here you can choose the amount of compression used: the lower the image quality, the smaller your file size, the higher the quality, the better your file size. I advise not to lower it any more then 50 and to preferably leaving it on 75 or more.
 If your file size is to big, the ‘File Size’ text in the Picture Preview Panel will be in red.

Capture:
  • Color
  • Depth
  • Object Mattes
We will only need color here. No sepia and black and white options are provided, if you want those, you will need to download the snapshot to your hard drive and change that manually. (If you are accustomed to using Photoshop, Gimp, … you can save the Depth capture too, as to use it for editing purposes.)


File size: …

This shows the total file size of the snapshot as a .bmp file format, and thus uncompressed. If you have ‘Send a postcard’ selected and the file size is highlighted in red, you will either have to lower image quality or image size.


Show interface in snapshot

By toggling this, you will see the user interface (the toolbar, menu, inventory, chat and IM window, …) in the snapshot. Except if you’re going to write tutorials, or have a question about one of the options in the menu’s, you won’t be needing this.


Show Hud objects in snapshot

If you turn this on, you will see the HUD (Heads-Up Display) objects you’re wearing in the snapshot too.


Keep open after saving

This will keep the Snapshot Preview window open and is very useful if you want to take multiple snapshots of the same scene or a moving object and you are going to chose the ones you like best later. You do need to press ‘Save’ each time you want to keep a picture, if you just press ‘New Snapshot’ the previous snapshot will not be emailed/uploaded/saved.


Keep specified aspect ratio

Always keep this toggled to prevent your pictures from having an odd distortion because they get scaled in either width or height. If you use the fullscreen preview, you’ll see the part of the picture will be saved framed in white.


Freeze frame (fullscreen preview)

Does wat it says, you get to see your picture in full screen preview and frozen. (This comes on handy if you are photographing moving objects like a dancing avatar and you want to check if the right parts of the picture are in focus/not suffering from motion blur.)


New Snapshot

Take a new snapshot, mind that the old one will not be emailed/saved/uploaded unless you have pressed ‘Save’ first.


Auto Snapshot

I advice to put this on so you will immediately see the effects of any changes you make when switching preferences in the Snapshot preview panel.

Save

Sends as a postcard/uploads/saves the pictures to your hard drive, depending on what you picked as an option.


Discard

Pressing discard closes the ‘Snapshot Preview’ window without saving the picture.


Using in-world Second Life photography equipment.
There is a huge offer of Second Life photography equipment build and sold (it’s hardly ever free) by Second Life users. It ranges from a simple photo camera (which changes your camera view so you won’t have your avatar in every picture anymore) over lightning equipment (softbox, spots, …) over different backgrounds to a complete model photography studio which includes modelling poses, props and different lightning options. If you want to read more about in-world Second Life photography equipment, check out Never 30 which is to Second Life what Canon is to first life.

Source

15 April 2012

How to wear multiple tattoo layers

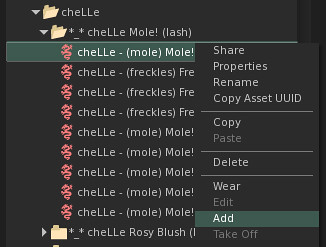
 1. Go to your inventory and select the tattoo layer that you want to wear and right click -> ADD


 Do this for any tattoo layer that you want to add-on (up to 5 times) and you will be able to wear multiple tattoo layers


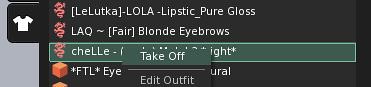
2.  When you click the little SHIRT (My Appearance) icon, and go to Wearing tab, you should see all the tattoo layers you’re wearing listed there, and right click “take off” to remove any layer.


Helpful tip: Tattoo layers are shown in the order that they’re worn. For example, I typically wear Eyeshadow -> then eyeliner -> then lashes. If you do it the other way around, lashes may be hidden under the eyeshadow layer and it won’t look as nice. If something doesn’t show up as well, just remove it and wear it again so it sits on top the other layers.


This post was originally posted in Juicy Bomb blog

03 March 2012

A Total Beginner's Guide

This is "A Total Beginner's Guide to Upgrading Your Avatar from Body by Jazzz" I found it from this location

AVATAR BASICS:
The appearance of your avatar is made up of several components. 

- YOUR BODY (the things a real person is born with) is made up of four pieces:

     •  Shape - This is the way your body looks in 3D.  Your height, weight, figure and the proportions of your head, arms, legs, etc.

     •  Skin -  The texture that is projected onto your shape.  This includes the color and texture of your skin, including makeup, nail polish, eyelashes and eyebrows, etc.  The skin you start in has 'underwear' built in, so that you can never really undress.  It also interferes with some outfits.  So you'll want a new skin soon.

     •  Eyes -  The color and appearance of your eyes.

     •  Hair -  Your hair color and style.


- YOUR CLOTHING (anything you wear):

     •  SL has a nearly infinite variety of clothing, shoes, jewelry and other accessories.

BUYING CURRENCY (LINDEN DOLLARS)

To purchase items in the many stores in SecondLife, you'll need "Linden Dollars", represented by the currency symbol "L$".  To buy Linden Dollars with your credit card, simply click the "BUY L$" button at the top right of your interface.  Then follow the onscreen instructions.  Your account will need to have current credit card information to purchase L$'s.  Follow the onscreen instructions to enter your billing information as well.

You can also earn Linden Dollars in-world, but this can be very difficult for beginners.  I recommend purchasing Linden Dollars if you are able, to get started, or borrowing from friends.

There are also quite a few "Freebie" stores in SecondLife where you can get new avatar elements for free.  Use your in-world search, and type in "Freebie" to find some.  But be aware that just as in Real Life, when it comes to quality, you generally get what you pay for.


CHANGING YOUR LOOK:
DEMOS:
Once you find an item you like, you may want to try it out before you buy.  Buying free or inexpensive "demos," if available, will let you see how it looks before you pay for the real item. 

BUYING:
To buy an item you like, just move your mouse over the in-store display until your cursor turns into a hand with a L$ symbol.  Click to begin the purchasing process.  Once you click, you'll have a chance to see what's inside the package you're about to buy, before you confirm the purchase.  Click "Buy", and your money will be deducted, and the item(s) will be moved to your inventory.

WEARING YOUR ITEM:
Once you've purchased an item, you need to find it in your inventory.  If your inventory window isn't already open, follow these steps: at the right of your interface, you will see several icons in a vertical bar.  Second from the bottom is a suitcase icon.  Click it, or press Ctrl-I (on PC's, Cmd-I on Macs) to open your Inventory window.

If you don't see the item you just purchased, try clicking the "RECENT" tab at the top of your Inventory window, to show items that have been added to your Inventory since you logged on this session.

Use the little triangle beside the folder for your purchased item to open it.  You should see your new item or items.  Double-click an item to wear it.  In your inventory, you'll see the word "worn" appear to the right of the item name.


TAKING THINGS OFF

Sometimes when you wear an item, the old item you were wearing will stay on, too.  You can type "worn" in your inventory search field (the white bar at the top of your inventory) to see everything you're wearing.  You can also open the "Current Outfit" folder to see everything you're wearing.  Right-click worn items and "Take Off" or "Detach From Yourself" to take them off.

UNPACKING ITEMS (OR: WHY AM I WEARING A BOX?!)
Sometimes, when you buy an item, especially a larger package of items, a detailed outfit, or a complete avatar package, it will come with many pieces packed in a single box.  When you look in your inventory, you'll only see one item, and if you wear it, you will suddenly find yourself surrounded by a large box!

IF YOU FIND YOURSELF WEARING A BOX, DON'T PANIC!  :)
Just right click the box, and choose "Detach".

This is a container that needs to be "unpacked" in order to be worn.  Many stores do not allow you to "rez" or "create" objects inside their stores.  They do this by limiting visitors' permission to build on their sim.  You can tell if they have done this by looking at the top of your interface.  To the right of the white Location Bar, you'll see a green star.  Immediately to the left of that star, you may see a grey box with a "no" red barred circle.  If you see that symbol, you may NOT rez (create) items in that area.

There are many areas in SecondLife where anyone may rez anything they wish.  These are called Sandboxes.  Here is a link to a popular Sandbox where you may unpack your items.  Just teleport there, go into the empty field.

Click here to visit public sand box 

Note: you have to go to ground to open the box (see on the top if the image with box dissaperas it means you can open the cox)

Here are the steps to unpack a box:
•  Drag your boxed item from your inventory to the ground. 
•  The box will appear on the ground.  It may take a moment for you to see it, so be patient.
•  Hover your mouse over the box. 
          - If your cursor turns into a box icon with an up arrow, just click the box to being opening.
          - If not, right click the box and choose "Open".
•  A window will open showing the contents of your box.  Click "Copy To Inventory" to unpack.
•  The contents of the box will be copied to your Inventory, and now you may wear them as usual.
•  Be sure to right click the box on the ground and "Delete" when you're done… you don't want to leave a mess in the Sandbox :)

28 February 2012

Second Life Addicts

This blog is dedicated to all addicted persons in Second Life...or whom just love the Second Life. I admit that I become addicted to Second Life from the first 30 minutes of using it and I know that there are a lot of people like me. That's why the name of the blog is Second Life Addicts. Trying to find out good places for shopping and for visiting is time wasting process so I decided to create this blog with some suggestions and tips. The purpose of the blog is to spend less money and less time. The blog will be about the woman outfits  that I suggest, it will be selected items worn on my avatar. The outfits will be freebies, cheap items or worth of cost items. Also some of items will be earned from lucky chairs, letter posters or midnight mania.Additionally I will suggest some places to visit and will show screenshots and landmarks of the places. In the blog will be available tips for second life, such as how to earn money there etc. and sometimes we will have contests. I hope you will enjoy reading the blog and the information you find here will be helpful.